Kipps.AI integration with Magento
Kipps AI chatbot and Magento website integration blog

Share This Article
Table of Contents
About Magento
Magento Website Builder is a powerful e-commerce platform designed for businesses looking to create scalable and customizable online stores. Known for its flexibility, Magento offers a wide range of features including advanced SEO tools, mobile-optimized designs, and extensive third-party integrations. It supports unlimited products and categories, providing robust inventory management. With a variety of themes and extensions, businesses can tailor their stores to meet specific needs. Magento's strong security measures and comprehensive analytics ensure a reliable and insightful shopping experience. Ideal for medium to large businesses, Magento facilitates growth and adaptability in a competitive e-commerce landscape.
For a Magento store, a Kipps.AI agent gives you a storefront employee that never clocks out — answering product questions, walking shoppers through shipping and returns policies, and qualifying leads while your team focuses on fulfillment and merchandising. Because Magento's design configuration applies footer content across the entire storefront by default, one change in the admin panel is enough to activate the widget catalog-wide, across category pages, product detail pages, and everywhere else a shopper might have a question.
Before you start: prerequisites
Magento stores tend to be more configuration-heavy than simpler website builders, so a little preparation goes a long way:
- Admin access with Content permissions. You'll need a Magento admin account with permission to edit Content → Design settings. If you're not the store administrator, ask them to grant this access or make the change on your behalf.
- A Kipps.AI account with a configured agent. Sign up at app.kipps.ai, build out your agent's knowledge base with your product catalog basics, shipping policy, and return policy, and configure its business hours.
- Your Kipps.AI embed script, copied from the install or integrations section of your Kipps.AI dashboard.
- Know whether you're running Magento Open Source or Adobe Commerce. The steps below are the same for both, but Adobe Commerce environments often sit behind additional caching layers (such as Varnish or a fastly CDN), which may need to be cleared separately after you save your changes.
- Familiarity with Magento's cache management. Magento aggressively caches rendered pages for performance. After adding the widget script, you will likely need to flush the cache before you see it reflected on your live storefront.
- A staging or development environment, if you have one. Testing the integration there first lets you confirm everything works before touching your live storefront.
Step-by-step integration guide
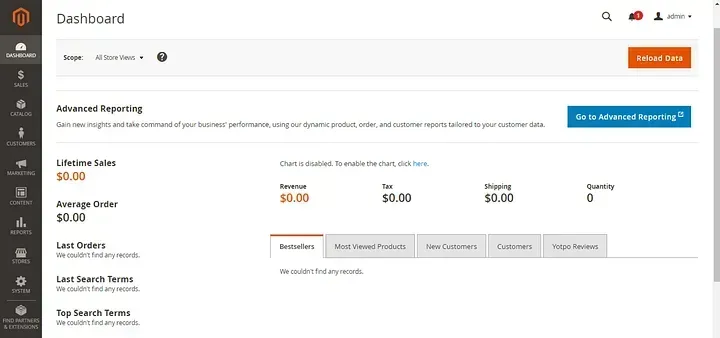
Step 1: Log in to your Magento admin panel
Log in to your Magento admin panel with an account that has Content permissions. The admin panel is a separate interface from your storefront — usually reached through a dedicated admin URL configured when your store was set up.
Step 2: Open the Configuration
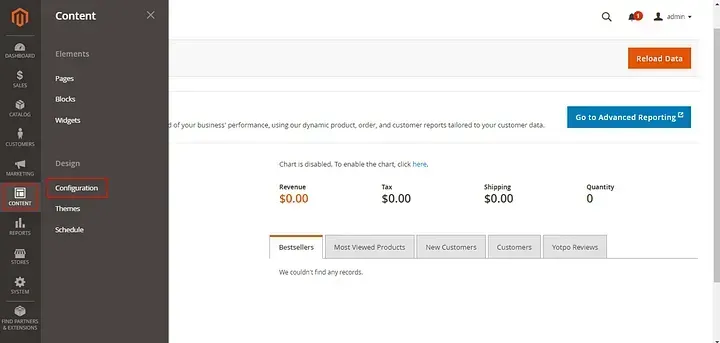
From the left navigation panel, click the CONTENT option, and it will show a list of options under the "Design" section. Then click the Configuration option. This is the section where Magento controls site-wide design elements, including HTML that should appear in your store's header and footer.
Step 3: Open the Edit menu
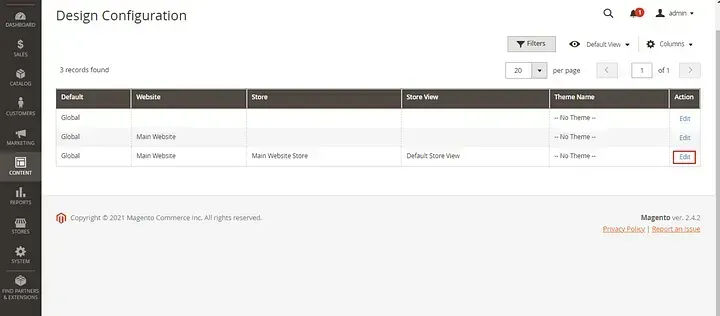
You'll be navigated to the "Design Configuration" page, where you can see the list of your stores. If your Magento instance runs multiple store views (for example, different languages or regions), note that each store view can technically have its own configuration — for most single-store setups, editing the default view is all you need. Click the Edit option for the "Default Store View."
Step 4: Make changes in the Footer
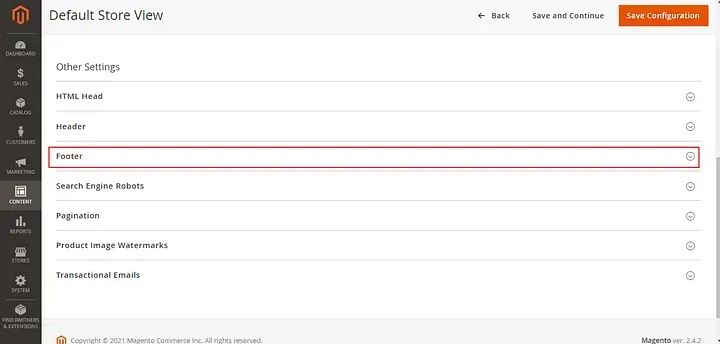
Click the Footer option on the default store view page. This is where Magento exposes a raw HTML/JavaScript field — usually labeled something like "Miscellaneous HTML" — that gets injected into the footer of every page rendered under this store view. Paste your Kipps.AI embed script into this field and save the configuration.
After saving, go to System → Cache Management and flush the relevant caches (particularly the full page cache). Because Magento serves cached HTML to visitors whenever possible, skipping this step is one of the most common reasons a newly added script doesn't appear right away.
Open your Magento website, and the Kipps.AI chat widget will be loaded along with your storefront. Check a few different page types — the homepage, a category page, and a product page — to confirm the widget shows up consistently across your catalog.
Troubleshooting common issues
- The widget doesn't appear after saving. Nine times out of ten, this is a caching issue. Flush Magento's cache from System → Cache Management, and if you're on Adobe Commerce with Varnish or a CDN in front of your store, purge that layer too.
- The widget shows on the default store view but not others. If you run multiple store views, the footer HTML field may need to be configured per view, or set to use the default value rather than a view-specific override. Check the "Use Default Value" checkbox next to the field on each store view.
- A theme or extension seems to interfere with the widget. Some Magento themes and third-party extensions minify, combine, or defer JavaScript for performance. If the widget loads inconsistently, temporarily disable JS minification/merging in Content → Configuration → JavaScript Settings to see if that resolves it, then re-enable it once you've confirmed the widget is compatible.
- The chat bubble overlaps your storefront's own UI. Magento themes often include sticky elements like "Compare," "Wishlist," or a cookie consent banner. Check your Kipps.AI widget's position settings in your dashboard to move it to a corner that doesn't conflict.
- You see a script-blocked error in the browser console. If your store enforces a Content Security Policy (common on Adobe Commerce Cloud), you may need to add Kipps.AI's script domain to your allowed sources under your store's security configuration.
- The widget works on staging but not production, or vice versa. Double check you saved the footer script on the correct environment — staging and production Magento instances typically have entirely separate admin panels and databases, so a change in one does not carry over to the other.
Best practices for a smooth launch
- Flush cache and hard-refresh every time you test. Magento's caching makes it easy to think a change failed when it actually just hasn't propagated yet.
- Test on a staging environment first if you have one, especially for a live, revenue-generating store where unexpected downtime or layout issues carry real cost.
- Configure business hours and escalation paths in Kipps.AI before launch, so shoppers get an accurate signal about when they're talking to the AI versus waiting on a human, especially important around order and shipping questions.
- Feed your agent real product and policy information. A Magento storefront lives or dies on trust around shipping times, returns, and stock availability — make sure your Kipps.AI knowledge base reflects your actual current policies, not placeholder text.
- Check the widget across store views if you run a multi-region store. Confirm it appears correctly and in the right language/context for each store view your customers use.
- Monitor page performance after launch. Footer placement keeps impact minimal, but it's worth confirming checkout and product pages still load quickly after adding any third-party script.
Frequently Asked Questions
No, the script is added to your store's design footer, which is separate from the checkout process itself. It doesn't touch checkout logic, only the visual layer where the chat widget appears.
This is almost always a caching issue. Magento caches rendered pages aggressively, so flush your cache under System → Cache Management, and purge any CDN or Varnish layer in front of your store if applicable.
Yes. Since the footer HTML field can be configured per store view, you can leave it enabled site-wide by using the default value, or override it per view if you want different behavior for different regions or languages.
Yes, the Design Configuration → Footer approach works the same way on both. Adobe Commerce deployments should just account for additional caching layers like Varnish when testing.
No. The footer field in Content → Design → Configuration is built specifically for adding scripts like this without editing theme templates or .phtml files directly.
Turn your Magento storefront into a store that answers questions around the clock. Sign up for Kipps.AI to configure your agent, or talk to our team if you want help planning a rollout across a multi-store Magento setup. Learn more about the platform at kipps.ai.